chipKIT® Development Platform
Inspired by Arduino™
- Get Started
- Learning
- Products
- Blog
- Beginner
For first time users of chipKIT modules. - Intermediate
For users who have a moderate exposure with chipKIT modules. - Advanced
For users who are experts with chipKIT modules. - Developers
- About Us
- Support
Stepper
| Stepper | |
|---|---|
| Quick Look | |
| Hardware | (External hardware) |
| Include | stepper.h |
This library controls a unipolar or bipolar stepper motor using 2 wires or 4 wires.
Detailed Introduction
Without supporting hardware, wiring several stepper motors would quickly use all of the available pins on the ChipKit. Therefore, this library relies on external circuitry such as an H-Bridge or a Darlington Array for controlling the stepper motors. The following tables show the logic levels of each pin for the given step in the sequence. When using the step function a negative number of steps may be specified to reverse the direction of the motor.
Note that 5 wire connections are not supported in this library.
Step Sequence (2 Pin)
| Step | Pin 1 | Pin 2 |
|---|---|---|
| 1 | 0 | 1 |
| 2 | 1 | 1 |
| 3 | 1 | 0 |
| 4 | 0 | 0 |
Step Sequence (4 Pin)
| Step | Pin 1 | Pin 2 | Pin 3 | Pin 4 |
|---|---|---|---|---|
| 1 | 1 | 0 | 1 | 0 |
| 2 | 0 | 1 | 1 | 0 |
| 3 | 0 | 1 | 0 | 1 |
| 4 | 1 | 0 | 0 | 1 |
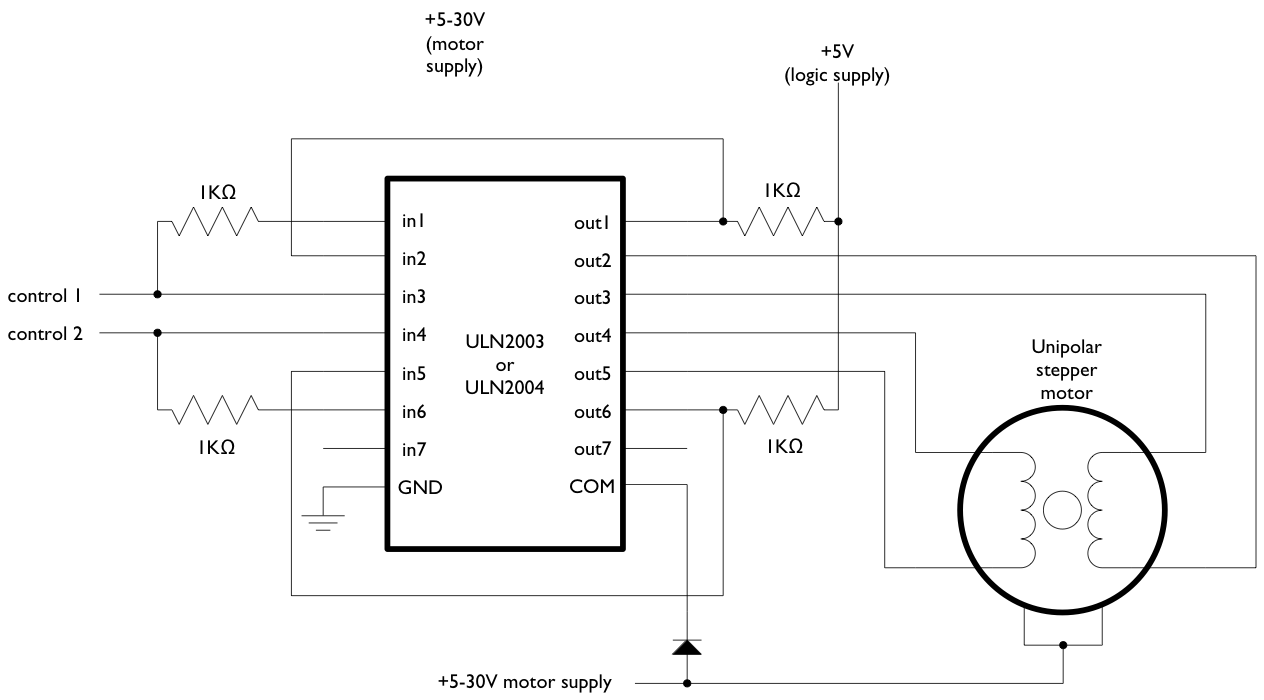
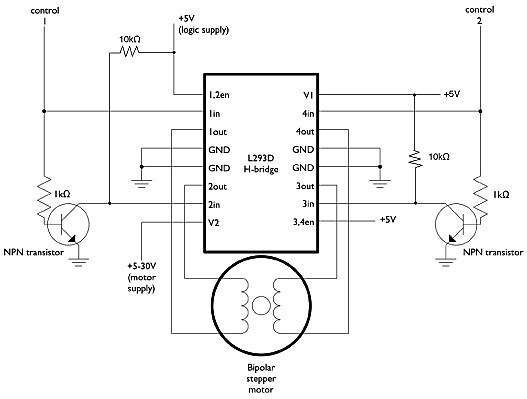
Wiring
2-Wire Unipolar with Darlington Array
2-Wire Bipolar with h-Bridge
4-Wire Unipolar with Darlington Array

Introductory Programs
The following sketch examples demonstrated how to use the stepper library object.
One Revoloution
This program drives a unipolar or bipolar stepper motor one revolution in one direction, then one revolution in the other direction.
/*
 Stepper Motor Control - one revolution

 This program drives a unipolar or bipolar stepper motor.
 The motor is attached to digital pins 8 - 11 of the Arduino.

 The motor should revolve one revolution in one direction, then
 one revolution in the other direction.


 Created 11 Mar. 2007
 Modified 30 Nov. 2009
 by Tom Igoe

 */

#include <Stepper.h>

const int stepsPerRevolution = 200;  // change this to fit the number of steps per revolution
                                     // for your motor

// initialize the stepper library on pins 8 through 11:
Stepper myStepper(stepsPerRevolution, 8,9,10,11);

void setup() {
  // set the speed at 60 rpm:
  myStepper.setSpeed(60);
  // initialize the serial port:
  Serial.begin(9600);
}

void loop() {
  // step one revolution  in one direction:
   Serial.println("clockwise");
  myStepper.step(stepsPerRevolution);
  delay(500);

   // step one revolution in the other direction:
  Serial.println("counterclockwise");
  myStepper.step(-stepsPerRevolution);
  delay(500);
}
One Step At A Time
This program drives a unipolar or bipolar stepper motor one step at a time, very slowly.
/*
 Stepper Motor Control - one step at a time

 This program drives a unipolar or bipolar stepper motor.
 The motor is attached to digital pins 8 - 11 of the Arduino.

 The motor will step one step at a time, very slowly.  You can use this to
 test that you've got the four wires of your stepper wired to the correct
 pins. If wired correctly, all steps should be in the same direction.

 Use this also to count the number of steps per revolution of your motor,
 if you don't know it.  Then plug that number into the oneRevolution
 example to see if you got it right.

 Created 30 Nov. 2009
 by Tom Igoe

 */

#include <Stepper.h>

const int stepsPerRevolution = 200;  // change this to fit the number of steps per revolution
                                     // for your motor

// initialize the stepper library on pins 8 through 11:
Stepper myStepper(stepsPerRevolution, 8,9,10,11);

int stepCount = 0;         // number of steps the motor has taken

void setup() {
  // initialize the serial port:
  Serial.begin(9600);
}

void loop() {
  // step one step:
  myStepper.step(1);
  Serial.print("steps:" );
  Serial.println(stepCount);
  stepCount++;
  delay(500);
}
Full library usage
Stepper
Constructors
Stepper(int number_of_steps, int motor_pin_1, int motor_pin_2)
Stepper(int number_of_steps, int motor_pin_1, int motor_pin_2);
For use with 2 wire applications
Stepper(int number_of_steps, int motor_pin_1, int motor_pin_2, int motor_pin_3, int motor_pin_4)
Stepper(int number_of_steps, int motor_pin_1, int motor_pin_2, int motor_pin_3, int motor_pin_4);
For use with 4 wire applications
Public Functions
setSpeed(long whatSpeed)
void setSpeed(long whatSpeed);
Sets the speed in RPM. This is calculated using the millis() Arduino function. The millis() function is the number of milliseconds that have elapsed since the Arduino began running the current program. The formula to calculate RPMs is 60,000ms / number_of_steps / whatSpeed. Therefore, you must make sure your number_of_steps is set correctly to obtain accurate time.
step(int number_of_steps)
void step(int number_of_steps);
Moves the stepper motor by the value given. Note that the setSpeed much be called prior to calling this function.
version(void)
int version(void);
Returns the current library version as an int
External Links
List some links to external resources, such as:
- github.com/chipKIT32/chipKIT-core/tree/master/pic32/libraries/Stepper - The github repository for the Stepper library.