chipKIT® Development Platform
Inspired by Arduino™
- Get Started
- Learning
- Products
- Blog
- Beginner
For first time users of chipKIT modules. - Intermediate
For users who have a moderate exposure with chipKIT modules. - Advanced
For users who are experts with chipKIT modules. - Developers
- About Us
- Support
Servo
| Servo | |
|---|---|
| Quick Look | |
| Hardware | (External hardware) |
| Include | servo.h |
This library allows a chipKIT Board to control servo motors. Servo motors are linear or angular actuators which contain a feedback sensor for precision positioning.
Detailed Introduction
This library supports up to 24 Servos. A standard servo typically allows the shaft to rotate between 0 and 180 degrees. Continuous rotation servos can rotate indefinitely at a rate specified in milliseconds. Servos have a wider range of applications. For example, you might use a standard servo to position a solar panel to face the sun. You could also use a continuous rotation servo control a conveyor belt in a factory. Hobbyist commonly use servos to control RC vehicles such as boats, planes, drones, and cars.
The way the library works is to keep a list of all possible servos. Each time you create a new Servo object and attach it to a pin, the next servo in the list is populated with the pin number, the duration (in uS) and which of three timers will control that servo.
The three timers are dynamically turned on/off as needed to support the number of servos used, with up to 8 servos on each of the three timers. Each time the timer fires, it clears the current servo pin and set the next one in the list, then sets itself to fire again in the future the duration of the new servo high period. After all servos have fired, the timer then sets itself to fire such that the entire process repeats every 20ms or so.
Even though timers are used, the actual pin setting and clearing is done in software in the timer's ISR. Thus these servos will have jitter based upon what other interrupts are enabled and running on the system at the time.
Wiring
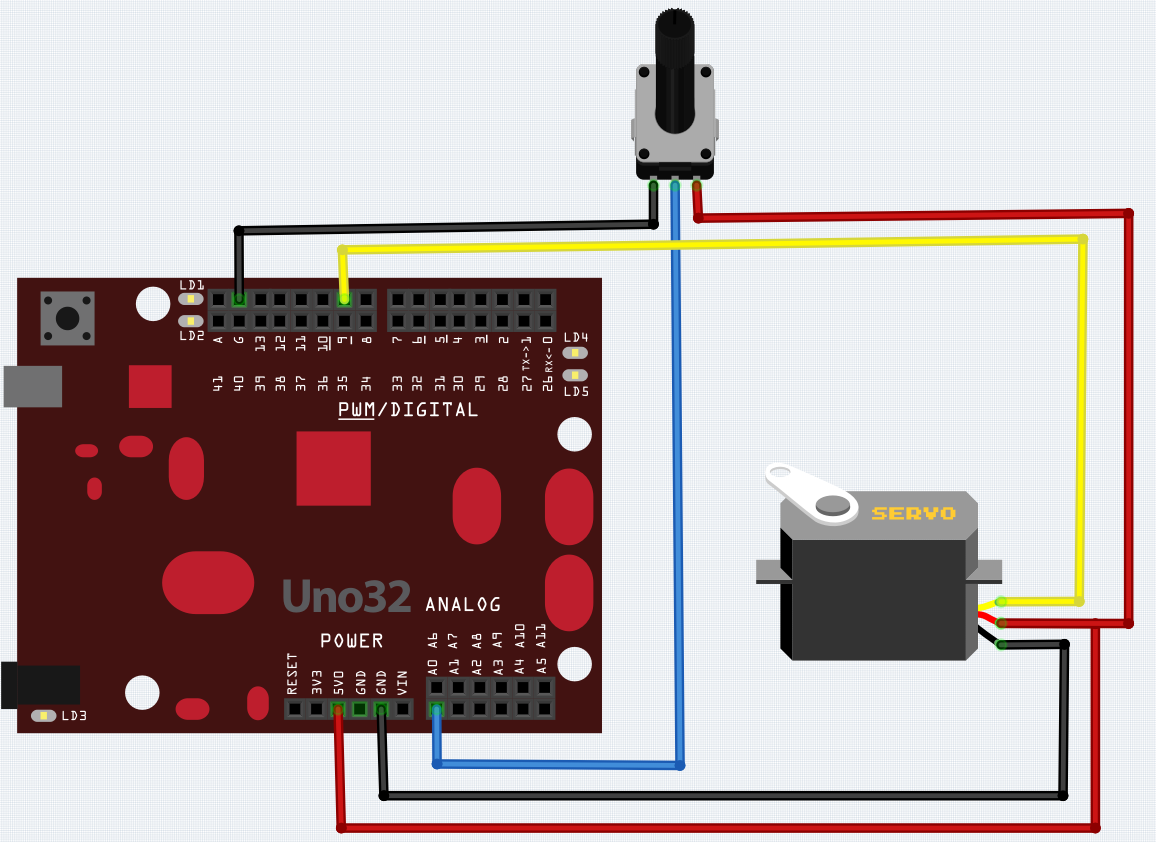 Servos have 3 wires (Power, Ground, and Signal). They consume a considerable amount of power and therefore the Power and Ground wires should be connected to a suitable power source and are often connected to an external power source instead the 5V pin on the chipKIT as shown here. Signal wires need a return path. Therefore, make sure the ground wire of the power power supply is connected to the ground pin of the chipKIT. The Signal wire of the servo should connected to an unused digital pin.
Note that analogWrite of PWM on pins associated with the timer are disabled when the first servo is attached. Timers are seized as needed in groups of 8 servos - 16 servos use two timers, 24 servos will use three.
For the PIC32, the three timers that are used are (in order): *Timer4 (for 1 through 8 servos) *Timer5 (for 9 through 16 servos) *Timer3 (for 17 through 24 servos)
Introductory Programs
The following sketch examples demonstrated how to instantiate a servo library object.
Sweep
Continuously sweeps a servo connected on Pin 9 between 0 and 180 degrees in 1 degree increments.
// Sweep
// by BARRAGAN <http://barraganstudio.com>
// This example code is in the public domain.

// NOTE: UART will be disabled when servo is attached to pin 0 or 1.


#include <Servo.h>

Servo myservo;  // create servo object to control a servo
                // a maximum of eight servo objects can be created

int pos = 0;    // variable to store the servo position

void setup()
{
  myservo.attach(9);  // attaches the servo on pin 9 to the servo object
}


void loop()
{
  for(pos = 0; pos < 180; pos += 1)  // goes from 0 degrees to 180 degrees
  {                                  // in steps of 1 degree
    myservo.write(pos);              // tell servo to go to position in variable 'pos'
    delay(15);                       // waits 15ms for the servo to reach the position
  }
  for(pos = 180; pos>=1; pos-=1)     // goes from 180 degrees to 0 degrees
  {
    myservo.write(pos);              // tell servo to go to position in variable 'pos'
    delay(15);                       // waits 15ms for the servo to reach the position
  }
}
Knob
Demonstrates how to control a servos position using a potentiometer. The voltage of a potentiometer is converted to an integer value between 0 and 1023 using the analog to digital converter (ADC) of Pin A0. This value is then scaled and the position of the servo is set to a value between 0 and 180 degrees.
// Controlling a servo position using a potentiometer (variable resistor)
// by Michal Rinott <http://people.interaction-ivrea.it/m.rinott>

// NOTE: UART will be disabled when servo is attached to pin 0 or 1.


#include <Servo.h>


Servo myservo;  // create servo object to control a servo

int potpin = 0;  // analog pin used to connect the potentiometer
int val;    // variable to read the value from the analog pin

void setup()
{
  myservo.attach(9);  // attaches the servo on pin 9 to the servo object
}

void loop()
{
  val = analogRead(potpin);            // reads the value of the potentiometer (value between 0 and 1023)
  val = map(val, 0, 1023, 0, 179);     // scale it to use it with the servo (value between 0 and 180)
  myservo.write(val);                  // sets the servo position according to the scaled value
  delay(15);                           // waits for the servo to get there
}
Full library usage
Servo
Constructors
attach(int pin)
uint8_t attach(int pin);
Attach the given pin to the next free channel, sets pinMode, returns channel number or 0 if failure
attach(int pin, int min, int max)
uint8_t attach(int pin, int min, int max);
As above but also sets min and max values for writes.
Constants
| Name | Default Value | Description |
|---|---|---|
| Servo_VERSION | [version] | Software version of this library |
| SERVOS_PER_TIMER | 8 | Maximum number of servos controlled by one timer |
| MAX_SERVOS | 24 | Maximum number of servos this library can support at once |
| MIN_PULSE_WIDTH | 544 | Shortest pulse sent to a servo (us) |
| MAX_PULSE_WIDTH | 2400 | Longest pulse sent to a servo (us) |
| DEFAULT_PULSE_WIDTH | 1500 | Default pulse width when servo is attached (us) |
| REFRESH_INTERVAL | 20000 | Minumim time to refresh servos in microseconds |
| INVALID_SERVO | 255 | Flag indicating an invalid servo index |
Public Functions
detach()
void detach();
Disables the associated Pin and Timer
write(int value)
void write(int value);
If value is < 200 its treated as an angle, otherwise as pulse width in microseconds
writeMicroseconds(int value)
void writeMicroseconds(int value);
Write pulse width in microseconds
read()
int read();
Returns current pulse width as an angle between 0 and 180 degrees
readMicroseconds()
int readMicroseconds();
Returns current pulse width in microseconds for this servo (was read_us() in first release)
attached()
bool attached();
Return true if this servo is attached, otherwise false
External Links
List some links to external resources, such as:
- github.com/chipKIT32/chipKIT-core/tree/master/pic32/libraries/Servo - The github repository for the Servo library.