chipKIT® Development Platform
Inspired by Arduino™
- Get Started
- Learning
- Products
- Blog
- Beginner
For first time users of chipKIT modules. - Intermediate
For users who have a moderate exposure with chipKIT modules. - Advanced
For users who are experts with chipKIT modules. - Developers
- About Us
- Support
Programming chipKIT Boards from MPLAB® X IDE Without a Programmer/Debugger
Posted 2016-08-11 16:07:05 by MajenkoOverview:
Did you know that you can program your chipKIT board or any PIC32 chip preprogrammed with a chipKIT Bootloader right from MPLAB X? It's actually quite easy to do. This tutorial will demonstrate how to obtain the proper binaries and how to set up MPLAB X to download programs written in C or MIPS Assembly to a PIC32 using the AVRdude bootloader. Note that this tutorial including screen captures was done using a Windows® 7 PC.
What you will need:
To complete this task, you will require the following:
- The latest version of MPLAB X IDE available as a FREE download
- If you are programming in C or C++, you will also need the MPLAB XC32 compiler also available as a FREE download
- Finally, you will also need the latest version of the chipKIT MPIDE as this will contain modified version of the avrdude bootloader files and appropriate linker script: https://chipkit.net/started/install-chipkit-software/
Procedure:
-
Unzip the chipKIT MPIDE to a location on your computer
-
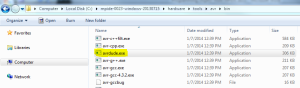
Navigate to the MPIDE folder an locate avrdude.exe and avrdude.conf in the following folders:
-
avrdude.exe:
mpide-0023-windows-xxxxxxxx\hardware\tools\avr\bin\avrdude.exe
-
avrdude.exe:
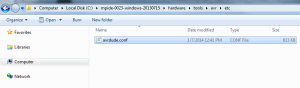
2. **avrdude.conf**: `mpide-0023-windows-xxxxxxxx\hardware\tools\avr\etc\avrdude.conf`
- Copy both of these and paste into your MPLAB X directory:
C:\Program Files\Microchip\MPLABX\mplab_ide\bin
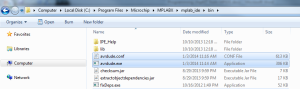
Note: MPLAB X IDE will need to be installed on your computer for this folder to have been created.
-
Next, open MPLAB X and set up your project as you normally would and write your code. (If you are not familiar on how to do any of these please refer to the tutorials towards the bottom of our Academia page: https://chipkit.net/academia/)
-
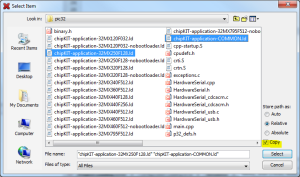
The bootloader pre-programmed on the PIC32 does take up some room in Flash program memory. Therefore, to make sure we do not overwrite the bootloader, we will need to tell MPLAB X where to put our program code. This will be done using a linker script. There are special linker scripts in our MPIDE download that are already formatted to accommodate the bootloader. In the MPLAB X IDE Project window, right click on the Linker Files folder and select Add Existing Items.... In the dialog, navigate to where you unzipped MPIDE and locate the linker script for your particular device (PIC32MX250F128B used in this tutorial). It will be called something like "chipKIT-application-32MX250F128.ld". You will also need an additional script called "chipKIT-application-COMMON.ld". Select both of these files, check the Copy checkbox, and press Select to close the window and add these files to your project folder.
- We will need to make some changes to these linker scripts. Double-click on the part-specific linker script (chipKIT-application-32MX250F128.ld in this tutorial) to open it. Scroll down through the linker script to the last line and uncomment the section:
INCLUDE "chipKIT-application-COMMON.ld"
- Double-click on the "chipKIT-application-COMMON.ld linker" script. Scroll down to approximately line 574 and comment out the line:
/* ASSERT (SIZEOF(.header_info) == 76, "MPIDE Version not specfied correctly")*/
- Next, we will need to let MPLAB X know that we wish to use avrdude to program the PIC32. Therefore, right-click on your project and select [Properties] to open the Project Properties window.

- In the Project Properties Window, select the Building category. On the right side of the window, check the Execute this line after build check box and add the following code to the text field under the check box:
"C:\Program Files\Microchip\MPLABX\mplab_ide\bin\avrdude.exe" -C "C:\Program\Microchip\MPLABX\mplab_ide\bin\avrdude.conf" -v -p32MX250F128B -cstk500v2 -P COM49 -b 115200 -U flash:w:${ImagePath}
Some important things to note here:
- You will need to make sure you've selected your MCU if not using the PIC32MX250F128B as shown in the example.
- Similarly, you will also need to change the COM port to the one assigned to your chipKIT Platform. The COM port can be found in your Device Manager (on Windows machines)
- Finally, to program your PIC32, make sure that it is in bootloader mode. Depending on the board you have, this may require that you press some buttons or this could be done automatically through the use of an FTDI UART-to-USB chip on the board. Once in bootloader mode, click either the Build or Clean and Build button. Following build, the avrdude bootloader should be called and the PIC32 programmed over the COM port selected with your code.
IMPORTANT!! The bootloader will be executed anytime you select Build, Clean and Build or if you attempt to enter Debug mode. The bootloader often resides in sections of memory that are used for debugging. Therefore, if you enter debug mode and your PIC32 is connected to your computer, there is a good chance you will overwrite the bootloader and it will need to be programmed back onto the chip using an external programmer/debugger.
Therefore, always disconnect the USB cable if you plan on doing any code debugging with the simulator. You will not be able to do hardware debugging. A programmer/debugger is needed for that. You will also need to deselect the Execute this line after build checkbox in the Project Properties>Building window shown in Step 9. Otherwise you will receive an error.