chipKIT® Development Platform
Inspired by Arduino™
- Get Started
- Learning
- Products
- Blog
- Beginner
For first time users of chipKIT modules. - Intermediate
For users who have a moderate exposure with chipKIT modules. - Advanced
For users who are experts with chipKIT modules. - Developers
- About Us
- Support
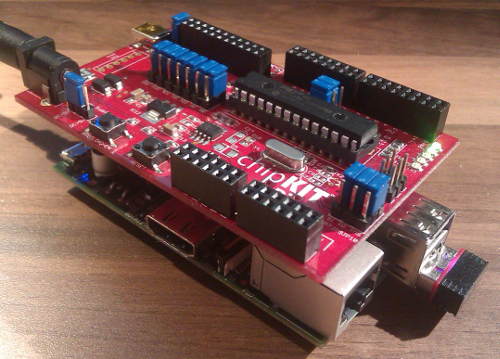
Remote programming a chipKIT Pi
Posted 2016-02-16 08:26:29 by MajenkoSo you have a chipKIT Pi, which you have dutifully attached to a Raspberry Pi, and you'd like to deploy it "in the field" (with the cows). That's fair enough. What you'd like to be able to do, though, is upgrade the firmware on the chipKIT Pi without having to go into the field (those cows are scary, man!).
So how would you do that? You can't program the chipKIT Pi without pressing the RESET and BOOTLOAD-EN buttons (and you're not about to train cows to do that for you), so what are your options?
Well, UECIDE has the answer for you.
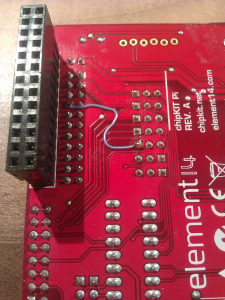
First you will need to modify your chipKIT Pi. Don't worry, it's only a simple small modification. Basically you need to connect the BOOTLOAD-EN signal to one of the GPIO pins on the Raspberry Pi header.
Connect pin 8 of the chipKIT Pi pass-through header (GPIO17 on the Raspberry Pi) to the nearest pin of JP6 with a piece of fine wire. I use 30AWG wire-wrapping wire. This will allow the Raspberry Pi to trigger the bootloader automatically (hopefully future versions of the chipKIT Pi will have this modification in place already).
Now you can enter programming mode from the Raspberry Pi by setting GPIO 17 to an output and driving it LOW, then setting GPIO 4 to an output and driving that low too (it is connected to RESET), then releasing both the GPIO lines in reverse order. It's good to put a short delay between releasing GPIO 4 and GPIO 17.
To make things even easier we have a chipKIT Pi support package in our Debian repository. Add the repository to your /etc/apt/sources.list file:
$ sudo nano /etc/apt/sources.list
Add the line:
deb http://dist.majenko.co.uk/ stable main
You can also add our signing key so it doesn't ask if you want to install unauthorized packages:
$ wget -O - http://dist.majenko.co.uk/key.asc | sudo apt-key add -
The package is called "ckpi-support" and it sets up all you will need in order to program the chipKIT Pi remotely from UECIDE. It will:
- Install avahi-daemon (if not already installed)
- Configure a "ckpi" user
- Install "pic32prog"
- Install scripts for controlling the chipKIT Pi:
- ckpi-reboot (reboots the chipKIT Pi)
- ckpi-program (reboots the chipKIT Pi and triggers the bootloader)
- Install an mDNS service so UECIDE can find the board on the network
So go ahead and install the package now:
$ sudo apt-get update
$ sudo apt-get install ckpi-support
If all goes well it will have asked you for a new password to give to the "ckpi" user. Remember this, as you will want it again later.
One more small modification you will need to make (if you haven't done it in the past) is to disable the "getty" process on /dev/ttyAMA0 (the serial port).
First edit (as root) the file /boot/cmdline
$ sudo nano /boot/cmdline
Remove from that file any references to ttyAMA0 (there should be a console= entry in one line that points to it - remove it) and save the file.
DEBIAN WHEEZY
Edit the file /etc/inittab
$ sudo nano /etc/inittab
and look for the line:
T0:23:respawn:/sbin/getty -L ttyAMA0 115200 vt100
It is most probably right at the end of the file. Comment the line out by placing a # at the start of it and save the file out. You can now either reboot to enable the change, or trigger a reload of the file:
$ sudo kill -HUP 1
Now you're good to go!
DEBIAN JESSIE
Disable and permanently kill the serial-getty service:
$ sudo systemctl disable serial-getty@ttyAMA0
$ sudo systemctl mask serial-getty@ttyAMA0
You might need to reboot after this to restore the /dev/ttyAMA0 permissions back to what they should be since the getty service leaves them in a rather odd state.
**Now on to the UECIDE side of things... **
You'll need the latest version of UECIDE as it has the networking support you'll be using, so if you aren't already running it then go ahead and download it. This is the version for your PC of course, not for the Pi. You don't need it on the Pi.
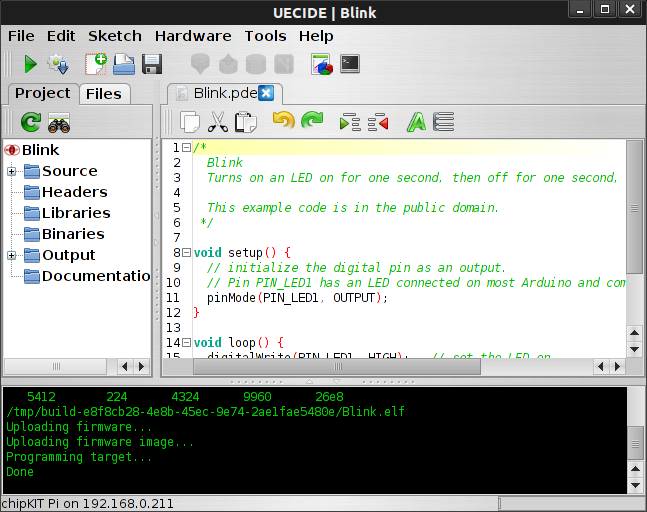
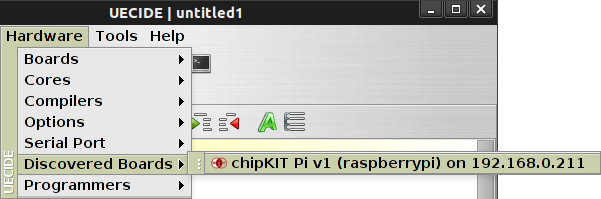
Load UECIDE up, ensure the chipKIT Pi board is installed (and the latest version), and after a few moments it should detect the Raspberry Pi for you:

You should now be able to select the board from the "Discovered Boards" menu:
And there should now be a suitable entry in the "Programmers" menu:

Important note: Those images are from a slightly older version of UECIDE. The current version lists the boards under the "Devices" menu in Hardware, not "Discovered Boards". Also it doesn't currently notify you of boards as it finds them. Just check the menu to see if the board is there.
Now you can just compile and upload your sketch as if you were directly connected to the chipKIT Pi. The first time you upload it will ask you for the password for the "ckpi" user - the password you entered when installing the support package. If you want you can tell UECIDE to save the password forever (it puts it in your preferences.txt file), but even if you don't do that it will still remember it for the rest of your session so you won't need to re-enter it again until you next load UECIDE.